Showing posts with label Windows. Show all posts

Friday, 20 March 2020

How to block /unblock USB Ports in Windows


USB ports are ports are used for different purposes like data transfer between your computer and external hard disk or pen drive.
Disabling USB is one of the best way to stop unauthorized access to your data. Also it stops your computer from viruses which may come from infected flash drives.
In this article, you will learn different ways to block/unblock USB ports in Windows:

Method 1: Using Registry Editor

Step 1: Go to Registry Editor- Windows key + R and type regedit and hit Enter.

Step 2: Go to HKEY_LOCAL_MACHINE -> SYSTEM -> CurrentControlSet -> services -> USBSTOR

Step 3: In the USBSTOR, find the Start DWORD.

Step 4:Double click Start to edit the value.

Change the value data to 4 and the click OK button.

Close Registry Edit.

You are done.

Wednesday, 22 May 2019

How to setup auto login in Windows


There may be several reasons for you to setup auto login in your computer. Like when you are away from your computer and for some reason you computer restarts and you want to start a program without login into it. But before setting up auto login into your computer, you must that somebody might get physical access to your important data.

If you are sure that nobody has physical access to your computer or data in your computer is not sensitive, then following the procedure below to configure automatic log on to windows.

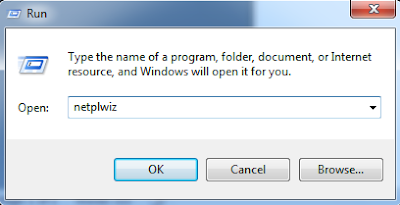
Step 1: Type netplwiz in Run program.
It will open Advanced User Accounts program.

Step 2: In User Accounts popup, go to Users tab and Uncheck the box next to “Users must enter a username and password to use this computer”.

Step 3 : Click Apply button. Another popup will come up. Enter username and password of user account which you want to setup for automatic log in.

Step 4 : Click Ok button.

You are done. Restart your computer and see whether windows logs in automatically.


Please comment if you find anything incorrect, or you want to improve the topic discussed above.

Friday, 22 March 2019

How to automatically shut down computer using Task scheduler(without batch file)

You might forget to shut down your computer while leaving office or your students might forget to shut down computers in lab. In either case, you may want to shut down the computers after they are in use and you know they won’t be in use for a specific period of time. So you plan to shut down all computers at a specific period of time. Here is a simple tutorial to do so.
In this first method, I will do the job without creating a BAT file.

Step 1: Open Task Scheduler. Click on Create Basic Task


Step 2: Give a name to your task say, “ShutdownPC” and press Next button.


Step 3: In next window, Choose Daily option. And click Next button.


Step 4: In next windows, set time when computer should shut down.Leave everything as it is. And press Next button.


Step 5: Now choose action from next windows. In our case, choose first option, Start a program and press Next button.


Step 6: Next window asks to provide program to start . In this case, it is shutdown.exe. After browsing shutdown.exe program and adding ‘/s’ in Add arguments field, click Next button.


Step 7: Next window gives a summary of our scheduled task. Click Finish button.

Done!

In next post, i will post about the same topic but using batch file.

Thursday, 21 March 2019

Make a file read-only to prevent changes


Read-only files have special property that their contents can't be modified, instead it can be read.
These files can also be copied, moved, renamed or deleted.
Following is the step-by-step procedure to make a file read-only:-
Step 1: Right click on the file you want to make it read-only and click Properties.


Step 2: Select General tab and look for Read-only check-box.

Step 3: Check Read-only box and click OK.


This way you can avoid unintentional or unauthorized changes in files.

Wednesday, 20 March 2019

How to enable hidden administrator account


This step-by-step article describes how to enable the built-in administrator account.
Method 1: Using Command Prompt
To enable the built-in administrator account, follow these steps:
Step1: Click Start, type cmd in the Start Search box. In the search results list, right-click Command Prompt, and then click Run as Administrator.
When you are prompted by User Account Control, click Yes.
Step2: At the command prompt, type net user administrator /active:yes, and then press Enter.
Step 3: Type net user administrator <actaulPassword>, and then press Enter.
Step 4: Close Command Prompt.
Step 5: Log off the current user account and you will be able to login using administrator account.


Please comment if you find anything incorrect, or you want to improve the topic discussed above.

Friday, 8 March 2019

How to stop On-Screen keyboard from popping up in Windows

It is very irritating when on-screen keyboard keeps popping-up. There are several ways you can get rid of this problem.  In this article, I will explain simple method to resolve above issue in Windows 7.
 Solution:
  (1).Click on the Start icon bottom left of computer screen.
  (2).Go to Control Panel.
   
 (3).Then click ‘Ease of Access’.


(4).Now click on ‘Use the computer without a mouse or keyboard’.
(5).You will find ‘Use On-Screen keyboard’ checked.
(6). Uncheck Use On-Screen Keyboard option.

Please comment if you find anything incorrect, or you want to improve the topic discussed above.